Cloud Service Center

Getting started with Azure Open AI API

Hello OpenAI enthusiasts! Remember that first chat with ChatGTP? For me, it was like chatting with a buddy who knew everything about every topic. Today, I’m going to take you on an introductory journey through Azure OpenAI, so that your application can have an AI buddy too. Our focus today is enabling you to create an application, and I will be skipping everything which is not on this critical path.


What is Azure OpenAI?

Azure OpenAI offers the same API as the one provided by OpenAI but is hosted by Microsoft. In other words, it’s a replica of the OpenAI API service. When you consume Azure OpenAI, there are no data transfers and no business relationship with OpenAI.


Why Azure OpenAI

Azure OpenAI is part of Azure and is whitelisted for usage at ETH, even with confidential data.

If your subscription is associated with an ETH Cost Center, billing and invoicing will be handled by ETH, simplifying the process for you.

Additionally, there are some security improvements; for example, you can restrict the API access to specific networks.


How to access Azure OpenAI

You can use the IT Shop to provision Azure Open AI for you, or use your own Azure Subscription.

For provisioning with IT Shop, log in the IT Shop on https://itshop.ethz.ch, then go to Cloud

Services and choose “Request Morpheus Subscritpion”. After having access to Morpheus, go to site https://morpheus.ethz.ch and log in.

Then click Provisioning –> Instances and click “Add”.

Choose “ETHZ OPENAI” and click Next. For the location, choose a location that includes the model you intend to work with, please check the model availability in the page below: 

Azure OpenAI Service models – Azure OpenAI | Microsoft Learn.


If you use your own Azure Subscription you will need to fill a simple form to request access to OpenAI, usually, it will take up to a day to receive access, afterwards you can proceed to create an Azure OpenAI resource. By using your own subscription you will have a higher api rate limit, the additional effort can be justified for production scenarios or if you face issues with rate limits. For most scenarios we recomend using ITShop/Morpheus 


Deploy the models –> This is required.

One significant difference between regular OpenAI and Azure OpenAI is that the models need to be deployed before being used. We recommend that you use the GPT variants and avoid models such as DaVinci because Microsoft plans to retire the non-GPT models during 2024.

In order to do that go go the Azure AI Studio https://oai.azure.com and log in with your ETH credentials. You should see the Azure AI Studio

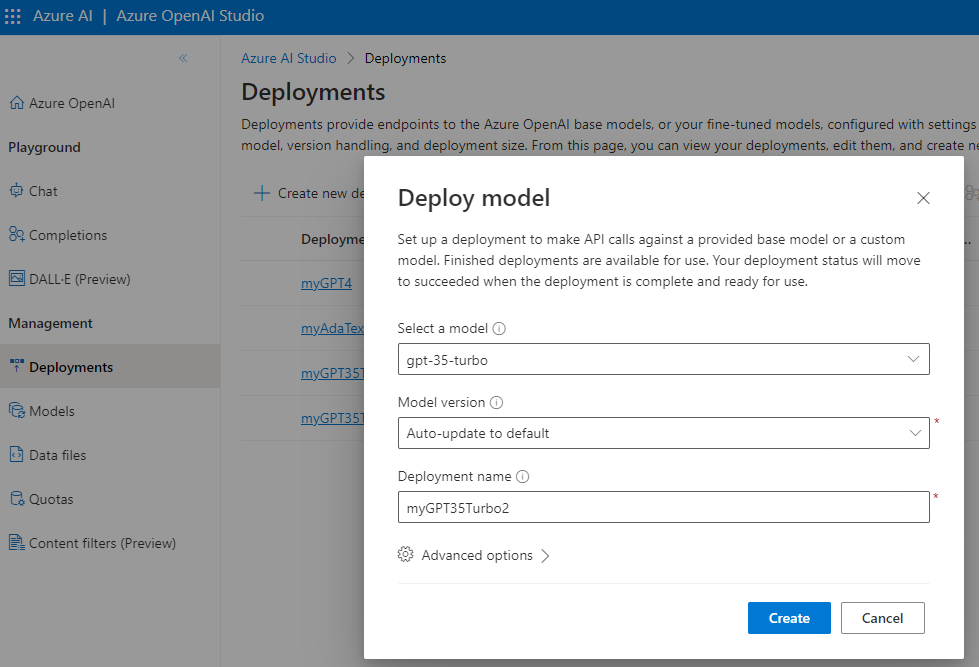
Now, you can deploy models like gpt-3.5-turbo or gpt-3.5-turbo-16k. For the deployment name, you can use the model’s name or choose a different one. I personally prefer names like “myGPT35Turbo” to distinguish between a Model and a Deployment. However, many code samples use the standard name, so using the Model name as the Deployment name might be considered a better practice. Anyway, your ship, your compass, you decide what suits you best.

To deploy the GPT3.5 Turbo Model, go to Deployments → Create New Deployment, then choose “gtp-35-turbo”, give it a deployment name and click Create.

If you need to create embeddings, you need to deploy an embeddings model such as “text-embedding-ada-002”. This is a second-generation embeddings model and will be available beyond 2024. I might write an article in the future about how to create embeddings, how to store them, and how to use them in your own code.

Testing your access to Azure AI API with code You will now need the API key and the Endpoint. To find these, in the Azure Portal, go to your Open AI resource –> Resource Management –> Keys and Endpoint Create a .env file with your API key. Careful, you don’t want to check in this file in a git repository. With this key someone can use your Azure Open AI resource at your expense.

#.env
OPENAI_API_KEY=y0urk3ywH1chY0uW0uldN07Tru5tY0urM0mW1th
Create a requirements.txt file as well.

# requirements.txt
python-dotenv
openai
Then create a virtual environment and install the packages, use python or python3, pip or pip3 depending on your installation:

python -m .venv venv
. .venv/bin/activate
pip install -r requirements.txt
Now you can create a Python .py file or a Jupyter Notebook .ipynb and try the API.

import os
import openai
from dotenv import load_dotenv

load_dotenv()

api_key = os.getenv("OPENAI_API_KEY")
masked_key = api_key[:2] + '*'*(len(api_key) - 4) + api_key[-2:]
print(masked_key)

openai.api_type = "azure"

# instead of cog-openai-0003, use your own endpoint
openai.api_base = "https://cog-openai-0003.openai.azure.com/"
openai.api_version = "2022-12-01"
openai.api_key = os.getenv("OPENAI_API_KEY")

# Completion API usage - Not recommended, older style of API usage
#
# SDK calls this "engine", but naming it "deployment_name" for clarity
deployment_name = 'myGPT35Turbo'
prompt = 'What is Azure OpenAI?'
response = openai.Completion.create(
    engine=deployment_name,
    prompt=prompt,
    max_tokens=120
)
print(response.choices[0].text)
print(response)

# Chat API usage - Recommended
#
deployment_name = 'myGPT35Turbo'
openai.api_version = "2023-03-15-preview"

messages = [
    {"role":"system", "content":"You are an AI assistant. You will talk like Snoop Dog"},
    {"role":"user", "content":"I want to know more about the universe?"},
    {"role":"assistant", "content":"Hello! How can I assist you today?"}
]

response = openai.ChatCompletion.create(
    temperature=0.9,
    engine=deployment_name,
    messages=messages
)
print(response)

# Experiment with Few Shot Learning
#
deployment_name = 'myGPT35Turbo'
openai.api_version = "2023-03-15-preview"

response = openai.ChatCompletion.create(
    engine=deployment_name,
    messages=[
        {"role": "system", "content": "You are a helpful assistant."},
        {"role": "user", "content": "That was an awesome experience"},
        {"role": "assistant", "content": "positive"},
        {"role": "user", "content": "I won't do that again"},
        {"role": "assistant", "content": "negative"},
        {"role": "user", "content": "That was not worth my time"},
        {"role": "assistant", "content": "negative"},
        {"role": "user", "content": "You can't miss this"}
    ]
)
print(response)
Few Shot Learning We will experiment with training the API using Few-Shot Learning. In this approach, we provide the API with a limited set of examples to demonstrate the desired output—hence the term ‘Few Shot’. OpenAI will then make inferences based on these examples. For instance, we aim to determine if the sentiment of a sentence is positive or negative. By providing sample sentences and their corresponding sentiments, we guide the API to evaluate and classify the content of future sentences accordingly

# Experiment with Few Shot Learning
deployment_name = 'myGPT35Turbo'
openai.api_version = "2023-03-15-preview"

response = openai.ChatCompletion.create(
    engine=deployment_name,
    messages=[
        {"role": "system", "content": "You are a helpful assistant."},
        {"role": "user", "content": "That was an awesome experience"},
        {"role": "assistant", "content": "positive"},
        {"role": "user", "content": "I won't do that again"},
        {"role": "assistant", "content": "negative"},
        {"role": "user", "content": "That was not worth my time"},
        {"role": "assistant", "content": "negative"},
        {"role": "user", "content": "You can't miss this"}
    ]
)

print(response)
The response will include “content”: “positive” as part of the message, which means it interpreted “You can’t miss this” as positive. Try changing the phrase to “You can miss this” instead and you will see that sometimes it evaluates the content as neutral or negative. If you change it to “You can definately miss this”, then the results will be more deterministic,the content will always be evaluated as negative. We also have the sample code in the Morpheus Confluence page: Azure Open AI API – Cloud Services – Confluence (ethz.ch)

So, there you have it folks. Remember, as Laozi said a journey of 1000 miles starts with a single step. I hope this article was helpful for you to get started with Azure Open AI.

If you would like to have some additional resources, there is plenty of information out there, I recommend the following links:

GitHub – openai/openai-cookbook: Examples and guides for using the OpenAI API

Introduction to Azure OpenAI Service – Training | Microsoft Learn


Or deploy your own ChatGPT by forking this repository:

airesmarques/microsoftazurechatgpt: 🤖 Azure ChatGPT: Private & secure ChatGPT for internal enterprise use 💼 (github.com)


Do you want more AI and/or Azure Open AI content?  Tell us about your use case and stay tuned.